Pages

Saturday 9 October 2010

My Limsa Laminsa Grade 1 mining research

I'm doing this research for our linkshell Ishitori.
You can find our forum HERE if you would like to join.

Quote from my forum post:

Hello

(Sorry for any spelling or grammar mistakes, I am doing my very best :)
Welcome to my mining research thread.
I'm gonna be mining until PS3 release so I figgured I'd do some looking into mining.

First things first.
I'm working on a Exposed Ore(Aim) and Strike zone yielding list.

To better understand what I'm talking about I'll include some pictures ^^;


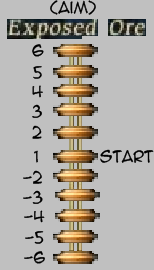
I split the AIM into 6+ to -6. 1 is the default position it will always be on when you start mining.
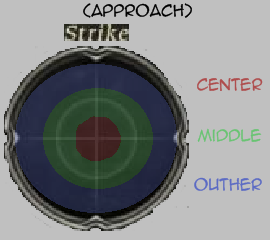
I also split the STRIKE zone into 3 zones. Red is center, Green is middle, Blue is outher.

I have found that mining on the same AIM repeatedly does not affect what item you get. I mine 10 mining points at the same AIM pr. test. (10 points x 6 strike = 60 items)

Grade 1

Mining point map to help with finding the points along with survey.

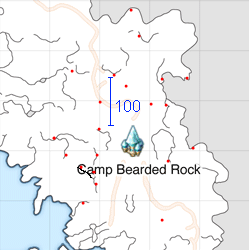
(Map is not finished. 100 stands for 100 yalms)

(AIM 6) - Miner rank 11/12 - yielding most on STRIKE middle
Fails.................................x9
Water rock.......................x1
Saltpeter...........................x3
Copper ore.......................x6
Copper ore +1..................x1
Copper ore +2...................x1
Lugworm..........................x6
Lugworm +2.....................x3
Bloodworm.......................x1
Bloodworm +1..................x2
Sea sand..........................x5
Alumen...............................x2
Alumen +3.........................x1
Scallop shells....................x2
Scallop shells +1...............x1
Scallop shells +3...............x1
Pyrite.................................x6
Wind rock..........................x2
Bone chip..........................x2
Limonite.............................x1
Yellow copper ore............x1
= 57 strikes (3 missed due to connection lost)

(AIM 1) - Miner rank 11 - yielding most on STRIKE middle
Fails..................................x5
Sea sand..........................x12
Sea sand +1.....................x3
Sea sand +2.....................x1
Saltpeter...........................x1
Lugworm..........................x3
Bloodworm.......................x3
Limonite............................x3
Soiled femur.....................x2
Soiled femur +1................x1
Wind rock.........................x3
Wind rock +1....................x2
Bone chip.........................x2
Bone chip +2....................x1
Water rock.......................x1
Water rock +2..................x1
Water rock +3..................x1
Pyrite................................x5
Copper ore.......................x4
Alumen.............................x4
Yellow copper ore...........x1
Scallop shells...................x1
= 60 strikes

(AIM -4) - Miner rank 12 - yielding most on STRIKE center
Fails.................................x4
Sea sand.........................x3
Sea sand +1....................x1
Copper ore......................x9
Copper ore +1.................x1
Copper ore +2.................x1
Limonite...........................x8
Pyrite...............................x9
Pyrite +1..........................x1
Bone chip........................x2
Soiled femur +1...............x1
Saltpeter.........................x2
Wind rock.......................x2
Water rock......................x5
Scallop shells.................x3
Scallop shells +1.............x1
Alumen............................x3
Bloodworm.....................x3
Bloodworm +1................x1
=60 strikes

(AIM -5) - Miner rank 12 - yielding most on STRIKE center/middle
Fails..................................x8
Wind rock.........................x2
Wind rock +1....................x1
Saltpeter...........................x1
Saltpeter +1......................x1
Saltpeter +3......................x1
Copper ore.......................x5
Copper ore +1..................x1
Yellow copper ore...........x1
Sea sand.........................x10
Sea sand +1...................x1
Sea sand +2.....................x1
Sea sand +3.....................x1
Bloodworm.......................x3
Limonite............................x1
Alumen.............................x1
Water rock.......................x5
Water rock +2..................x1
Pyrite................................x6
Bone chip.........................x2
Bone chip +1...................x2
Scallop shells...................x1
=56 strikes (4 missed due to connection lost)

(AIM -6) - Miner rank 10/11 - yielding most on STRIKE center
Fails.................................x5
Yellow copper ore...........x5
Yellow copper ore +2......x1
Yellow copper ore +3......x1
Alumen.............................x3
Alumen +1........................x2
Bloodworm.......................x5
Sea sand..........................x5
Sea sand +1.....................x3
Copper ore.......................x5
Scallop shells...................x1
Limonite............................x3
Water rock.......................x2
Pyrite................................x4
Bone chip.........................x1
Lugworm..........................x3
Saltpeter...........................x4
Saltpeter +1......................x1
Saltpeter +3......................x1
= 55 strikes (5 missed due to connection lost)


I will Update this list as I get more AIM info.

I'm back - in FFXIV!!

Sorry I didnt finish the FFXI noobie area gil guide, but I quit and started playing FFXIV instead. I also was in the closed beta ^^ fun time.

I'm going to work on mining until march, since my laptop cant run the game very well.
I'm very much looking forward to PS3 release. Alot of my old FFXI friends going to join then too ^^

Saturday 12 June 2010

FFXIV


First of sorry for the wait on FFXI guide, I'm still working on it but its going a little slow.

Its been out for awhile, but I thought this video was interesting (except for all the "oh thats sexy" comments lol... lame) anyways FFXIV seem to have alot of selection in the character creation for more individual looks, very nice.

Tuesday 25 May 2010

Starting Out: San d'Oria (Part 1)

What to kill: 1-6
I’ll start out in San d’Oria as Elvaan THF, but I want a sword instead of the dagger this time around, so I start out as WAR to be given the starter weapon Onion Sword. Then I go to the MH and change job to THF.

So let’s first have a look at what San d’Oria has to offer. They got the Blacksmith Guild, Carpenter Guild, and the Tanner’s Guild. This isn’t overly helpful to us, but once you get a job lvl 10+ you can start Logging in Ghelsba Outpost (You enter Ghelsba Outpost at (E-4) in West Ronfaure.

Tunnel Worm
Earth crystal 500g
Flint stone 1,5k (sell fast because it is used for a fame quest)

Ding Bats
Wind crystal 400g
Bat wing 3k (sell fast, also used in a fame quest)

As you can see I am going for the Tunnel Worm and Ding Bat money making strategy. Ding Bats are only out at night time so just kill Tunnel Worms until you see some Ding Bats.

Lets head out to West Ronfaure, but don’t forget Signet. Talk to Aravoge, T.K. at (F-10) South San d’Oria for Signet.

At lvl 6 I had 2 and a half stack of Earth crystals, 2 Wind crystals, 1 Bat wing and 1 and a half stack of Flint stones. AH the full stacks and get ready to head out for King Ranpeer’s Tomb at (H-11) in East Ronfaure. Keep in mind that you wont have a map at this time so be careful not to get lost ^^

Wednesday 19 May 2010

Ekstra Starting Out: Windurst note

If you lvl the WHM (or BLM,RDM for that matter) as your first party job.
Do NOT buy spells on AH. Buy them from the spell shop in Port Windurst. You can also buy a wand or a staff there for hitting monsters with.
However spells like Protectra you’ll have to buy on AH unless you were lucky and it dropped from the Yagudo acalytes.

Tuesday 18 May 2010

Starting Out: Windurst (Part 2)

What to kill: lvl 7-10
Take your 1 Rarab Tail and head to Port Windurst G-5. Talk to Kohlo-Lakolo and chose “I was born to be in S.O.B” After their little meeting is done, trade the Rarab Tail to Kohlo-Lakolo. Tada! You can now equip the lvl 7 Justice Badge.

Refresh your signet before you head out again.
This time we will be killing Yagudos and Crawlers. You should be able to kill Easy prey and Decent challenge monsters. To check, target monster and alt+c. You can find them around H-10. If you die don’t worry about it, just view it as a new opportunity to cap out your skills before you lvl. If you d-lvl just go back to killing bees until you regain your lvl, chances are you’ll get more honey and wings for a stack anyways.

From the Yagudo we want, Wind crystals, Yagudo feather, Yagudo bead necklace,
You can also steal Beastcoins from them.
From the Crawlers we want, Earth crystals, Silk thread and Crawler Calculus.
The silk thread sell for 21000gil on my server so make sure you kill some Crawlers ^^

At lvl 10 I had 1 and a half stack of Wind crystals, 3 stacks of Yagudo feathers, 7 Yagudo necklaces, and half a stack of Beastcoins. 1 and a half stack of Earth crystals, almost a stack with Silk thread and 3 Crawler calculus.
Again AH the full stacks and put the rest in MH, if you have 3 Crawler calculus you can do the Creepy Crawlies quest for 600gil
Quest is at Illu Bohjaa, Windurst Woods (I-6)

Starting out: Windurst conclusion:

I got in 2500g this time around, but imagine if I had gotten a whole stack of silk threads ^^

Once I have gotten THF to 10 I will change to WHM and do the Starting out: Windurst part 1 and 2 again for another 8400g and most likely a whole stack of honey and silk thread for an additional 26000g(depending on your server’s prices of course.)

8400x2= 16800 + 26000 = 42800gil + some extra from NPC junk selling and the yagudos drop a little gil too. And depending on how much time you have on your hand, you can easily do this in one day.
42800gil is A LOT of gil for someone starting out in FFXI.

Monday 17 May 2010

Starting Out: Windurst (Part 1)


I have decided to start out in Windurst, because it is the least newbie friendly city out of the 3. It was also my favourite when I started out, but I was having a hard time there.

I hope I can help you out though, new to MMOs or not ^^

Let’s first have a look at the races and the benefits of starting in their assigned cities.
Mithra and Tarutaru that start in Windurst are given the Windurstian Ring: Mp+3 Agi+1 Int+1
Elvaan starting in San d’Oria are given the San d’Orian Ring: Def 2 Str+1 Mnd+1
Hume and Galka that start in Bastok are given the Bastokan Ring: Hp+3 Dex+1 Vit+1
You can start with any race in any city, but if you don’t start in their assigned city you wont be given the ring.

Mithras has high Agi and Dex making them good thiefs. Tarutaru got high MP and Int making them good Blackmages (or mages in general.)
Elvaan got high Str, Mnd and HP making them good Paladins and Whitemages, however they got low MP so keep that in mind.
Hume are the best balanced class, I guess you could see them as jack-of-all-trades race.Galkas have high Str and HP like the Elvaan, and they are considered the best melee/DD race.

Start out as a Thief (THF):
Let’s ask ourselves: What will I need playing FFXI? My answer is: Gil, equipment and means of travel. So why THF? Because you will get “treasure hunt” at 15, and the only way to get gil when starting out in FFXI is farming and selling loot.

With gil you buy equipment :p (or camp NMs but I wont be focusing on that.)

Transport in FFXI is Chocobo(lvl20), Airship(Rank 5 or pay 500,000gil), Teleport (by Whitemages(WHM), Warp (by Blackmages(BLM) and some ferry rides (about 100gil)
But the majority will be by Teleport, and you will most likely be paying for most of them.

So I will recommend, THF as a solo farming job, and change to WHM for your first party levelling job. So this is what I will focus on in the starting out tips and tricks for Windurstians.

First things first:
When first logging into FFXI you’ll get a random cutsceen that will give you a little insight on an event going on in the city (they all somewhat leads to a mission later in the game.)
Then you will be given an Adventurer Coupon to trade in for 50gil.

To find the person you are to give the coupon to open your menu and select MAP.
Once on the map, click on MARKERS, now this does not always show you anything. If the markers tab is empty click your right or left arrow button to flip the page until a name pops up. You should se a green dot on the map now, that is the person you are going to trade the coupon to.

Once at the NPC select him/her/it, and open your menu again and click TRADE. Put your coupon in one of the boxes and click ok. And there you have it, you should now have 60gil (woho…)

Get ready to go party:
So you want to go party do you? Well you wont be doing that just yet. First you need at least lvl 10 (I recommend lvl 13) and then you need equipment, spells and maps.
Lets go get some gil then shall we.

We’re going to start out by lvling our THF for loot. We could just run around killing things, but it would be a waste of time, and you wont have enough inventory space for it either.

What does Windurstians need that I the newbie can offer? Lets look at our map to see what Windurst has to offer. In Windurst Woods you can see the Boneworkers Guild, and the Weavers Guild.
In Port Windurst you can see the Fisherman’s Guild.
In Windurst Waters you will find the Culinarian’s Guild.
All those Guilds are FFXIs Crafts. To craft you need two things, crystals and items.
Crystals are easy money so that’s probably what you will be selling the most.

Lets head out and get some loot and crystals, but to get crystals to drop you need to get a Signet from an NPC. Go to Windurst Woods and head to Leviathan’s Gate (Location K-10 see picture.)


Talk to Harara, W.W. and pick the option “Would you cast a Signet on me?”
A crystal will show up in the upper left corner of the screen.
Now you are ready to go kill some monsters so head out the gate.

The first thing I will save up for is 2200 for all the windurst maps, except the Castle Oztroya one for 3000g because we wont be needing it for awhile.
Remember to equip your starter weapon before you start attacking anything.
Menu – Equipment – Weapon goes in the Main box, as a THF you will have an Onion knife.

What to kill: lvl 1-7
We will be killing Bumblebee until lvl 7, after that they pretty much stop dropping items. They drop Wind crystal, Honey and Incest wing. All of those sell for an ok price and at an ok rate. You can find Bumblebees at G/H-11/12 East Sarutabaruta.


To attack, target the Bumblebee hit enter and select Attack, it will auto attack so you don’t have to worry about doing anything at this time since you don’t have any skills. Once your weapon skill to lvl 5 you can use Wasp Sting with dagger when your TP is 100% or more. To open your Weapon Skill(WS) menu, hit Alt+W. Then at lvl 5 you’ll get the ability to steal, lets make a macro for it. Open your menu, flip it once (right or left arrow button) you should see MACROS. Select Book02 and Confirm. Fill it in like this:


(The big S in Steal is very important.) Now you can close the menu again. To use steal macro now hit Alt+1 and you will use the steal ability.

There will also drop chests. The blue chest contains temporary items that will disappear when you zone. The brown chests contains item you can have if you can guess the lock combination.

Once you hit lvl 7 you should have about 4 stack of wind crystals, almost 1 stack of honey and 1 and a half stack of Incest wings. AH the full stacks you have of those items and put the rest in you MH. Rarab tails you can sell to NPC(save 1 for a quest though) to get more money for AH fees, they wont sell on AH anyways. If you have gotten any Beastmen’s Seals I would strongly suggest saving them for later, stuff them in you MH.

Get items to sell a little faster on AH:
If you see the wind crystal sell for 700g a stack, put your up for 698 or 699, they will sell a little faster that way.

When I had sold all my stacks from killing the Bumblebees, I had earned 5900gil, and I was only lvl 7. I'm very happy with that ^^